
Perhaps the two most popular microcontroller-based systems right now are those based on the Arduino and the Raspberry Pi (RP). While both have huge followings, they are not the same type of microcontroller. The RP is a complete small computer system with most the common add-on features like a keyboard and video display supported from the outset. The RP also has a lot more resources available (e.g., program memory) and it has considerably more processing power. Depending upon which version of RP you select, prices are going to be a little under $40 for most versions.
The Arduino family of microcontrollers are less ambitious in terms of user features. There is no native keyboard or video support. It has less memory and in many applications, runs without input from the user, and has less computing horsepower. Given these limitations, why would one ever choose an Arduino over a RP? The answer often boils down to economics: for many applications, Arduinos offer a more cost-effective solution.
Table 1 presents several microcontrollers from the Arduino family and some of the resources they bring to the table. If you want to develop an application that monitors your fish tank water temperature and can add fish food at predetermined intervals, which would you choose: A $40 RP or a $5 Nano? Both can do the job, so why pay more for the RP? You simply end up with a more expensive system with more underutilized resources.
There are thousands of applications where either microcontroller would work equally well, so developers usually pick the less expensive alternative: the Arduino. Let’s take a close look at the resources available on several Arduinos and compatibles.
Table 1. Arduino and Compatible Microcontrollers
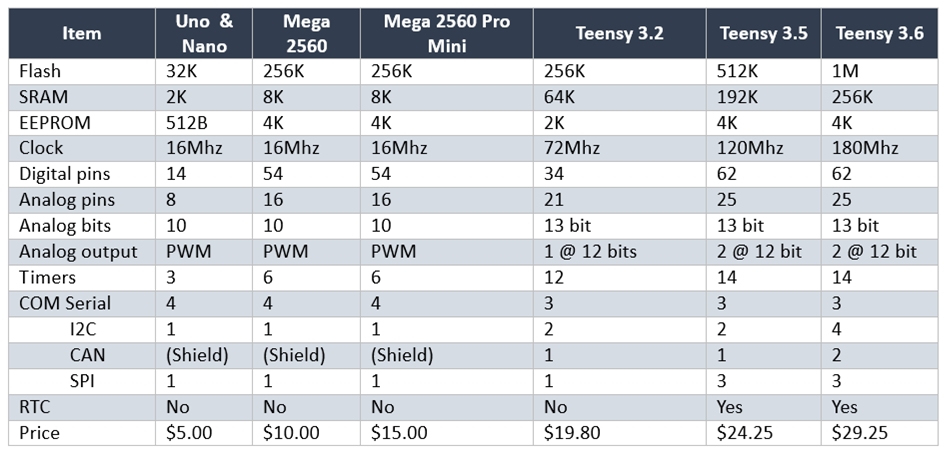
Arduino Resources
To make an informed decision about which Arduino to use for a given project, you need to understand each microcontroller’s resource base. During this discussion, you should reference Table 1 for the details. Both the RP and the Arduino need to be programmed in order to do something useful. The good news is that there are thousands of applications already written that are available to you. Even better, the Arduino is “Open Source.” That means both the hardware and the programming environment are freely available.
However, even if you just want to upload a program someone else has written, you will need to download the free Arduino Integrated Development Environment (IDE) from:
https://www.arduino.cc/en/main/software
The reason you need the IDE is because that’s the application that lets you move a program from a PC to the Arduino via a USB cable. There are IDE versions available for Windows, Mac, and Linux. We’ll have more to say about the Arduino IDE a little later. For now, let’s examine the resources buried within the microcontroller.
Flash Memory
Flash memory is similar to those common thumb drives that you plug into your USB port. The key feature is that, if power is removed, flash memory retains whatever has been stored in it. Therefore, when you use the IDE to upload an Arduino program (also called a sketch), that program ends up being stored in flash memory. By storing the program in flash memory, the next time you apply power to the Arduino, the program is ready to begin execution.
You’ll notice that the amount of flash memory seems pretty meager, ranging from 32 kilobytes to 1 megabyte. Given that most PCs today have a mega-munch of memory, what can you possibly do in just 32K? Actually, quite a lot. We developed a program for an amateur radio transmitter/receiver that provides its transmit-receive frequency management, a menuing system that manages a rotary encoder switch for changing menu options, and all of the Input/Output (I/O) processing for the transceiver, including an LCD display. The amount of flash memory used for storing the program is about 9K (9 Kilobytes). Because all Arduinos have a small program (called a bootloader) resident in flash memory to manage program uploads and execution, you really end up with about 30K of available flash memory for your own use. Still, given that our program code only used 9K, we still have about 21K free flash memory left to add new features if we choose to do so.
In fact, the reality is that, in almost all cases, the amount of flash memory is not the real limitation of a program. The real bottleneck is the amount of SRAM memory available.
SRAM Memory
SRAM stands for Static Random Access Memory. In an Arduino program, SRAM is where all of your program’s data ends up being stored. There are two problems with SRAM: 1) there’s not much of it available, and 2) it goes stupid when power is removed. Unlike flash memory that retains its bit pattern when power is removed, SRAM degenerates into some random bit pattern that results when power is reapplied.
You can think of available SRAM as being partitioned into two pieces: 1) the heap, and 2) the stack.
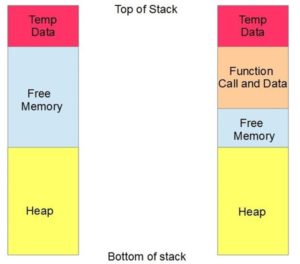
Figure 1. SRAM memory allocation between heap and stack.
The total amount of SRAM is referred to as the stack, so you can think of the top of the stack (TOS) and the bottom of the stack (BOS). However, the stack needs to share the SRAM with the heap space. The heap is a section of the stack space that is used to hold data that are stored globally in the program. Global data are those pieces of data that you want the entire program to have access to. The memory demands for the heap are known by the Arduino compiler when you compile the program within the IDE (i.e., a compile-time factor). In Figure 1, the left and right depictions of the heap are the same size. They are the same size because heap size normally does not change during program execution. (There are functions for dynamic memory allocations, but they can fragment the heap.)
Every Arduino program must have two functions named setup() and loop() present or it will not run. Within these two functions, the programmer will likely have defined at least some variables that the program will need to function properly (e.g., perhaps some variables to communicate with the PC via the USB cable). Because these two functions must be called by the program, those variables are known at compile time. Hence, both stack depictions show some level of temporary data shaded in red. If you choose to define more temporary data, the size of that red box would grow downward towards the BOS.
If the program code contained within the loop() function calls another function, any data used by that function gets added to the bottom of the temporary data already defined. The more functions your program calls, the more data that gets pushed onto the stack. That is, each function puts its own “orange box” in the available stack space. If one function has a function call statement, and that function also calls another function, these “nested function calls” start adding more and more orange space to the stack. This means that the amount of “free memory” in the stack is shrinking.
Now, guess what happens if the bottom of the temporary data collides with the top of the heap space? Well, all we can say for sure is that nothing good is going to happen. The really bad thing about “a stack collision” is that nothing obvious happens. There’s no white smoke; no alarms go off. Indeed, you may not even know it happened if the collision destroyed a piece of global data that your program never uses again. About the only evidence you may get from a stack collision is that your program may start acting “flaky”. That is, it doesn’t give the right results, but the bogus results may or may not produce the same consistently wrong values. Such program behavior is almost always an indication of a stack collision.
My rule of thumb: buy as much SRAM as you can afford. If you’re sticking with the Arduino, that means an Arduino Mega 2560 or Mega 2560 Pro Mini. The relative sizes are shown in Figure 2 in case size impacts your design. By way of comparison, the Teensy controllers are about the size of the Arduino Nano, but about an inch longer.
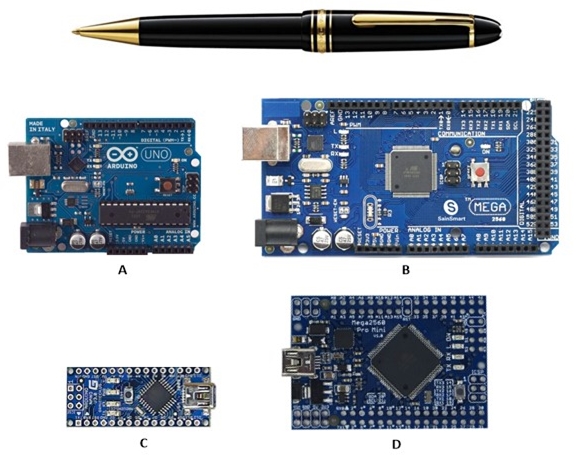
Figure 2. Arduino microcontrollers’ relative size compared to a pen. Displayed are the Uno (A), Mega 2560 (B), Nano (C), and the Mega 2560 Pro Mini (D)
EEPROM and Clock
EEPROM is Electrically Erasable Programmable Read-Only Memory. Functionally, EEPROM is similar to flash memory in that it retains its information when power is removed. There are, however, several differences between EEPROM and flash memory. First, EEPROM can be changed at run time, while flash is changed at compile time. This means, for example, you could ask your user which font size they want to use, store it in EEPROM, and the next time the program is started, you could read that font size from EEPROM and use it while the program runs. If you stored that same data in SRAM, it would disappear the instant you removed the power source. Second, EEPROM reading/writing is slower than flash or SRAM. Therefore, you would probably not want to use EEPROM for processor-intensive data. Third, there isn’t a lot of EEPROM available relative to the other memory types. It is, however, perfectly suited for “configuration-type” data (e.g., font size, dedicated port information, colors, editing constants, file names, etc.). Finally, EEPROM has a finite number of write cycles. Today’s EEPROMs have cycle counts in the hundreds of thousands, so it’s probably not a serious limitation.
Note that all of the Arduinos are clocked at 16MHz, while all of the Teensys are at least 4x faster. MHz stands for megahertz, where a hertz is one complete clock cycle. Therefore, 16MHz means the Arduinos are clocked at 16 million cycles per second. Each program instruction burned into the chip takes so many clock cycles to complete. For example, adding two numbers together might take six clock cycles to perform. The microcontroller clock speed, therefore, acts like a traffic light in determining how fast the microcontroller can execute program instructions and move data around the system.
For example, if the Nano and the Teensy 3.6 are asked to add two numbers together and both use six clock cycles, ceteris paribus, the Teensy will do the calculation over 11x faster than the Nano simply because it has a faster clock. Because all of the Arduinos are clocked at the same speed, clock speed for them is a moot point. However, if you have an application that needs to process a lot of data quickly, perhaps a Teensy would be a better choice.
Other Resources
All of the remaining items presented in Table 1 are usually of less concern than the memory limitations. The number of digital I/O pins determines how many input and output devices can communicate with the microcontroller. Note the huge jump between the Uno/Nano and the Mega 2560 device. Usually an I/O pin is connected to a sensor, switch, or some other external device. Keep in mind that the digital pins are low amperage devices, and can only handle a maximum current of about 40mA. So, if you’re trying to light an LED, you’ll need to place a current limiting resistor (e.g., 470 ohms) between the LED and the pin. For higher current devices, it may be necessary to add additional circuitry.
Note that eight pins are capable of analog inputs at 10 bits of resolution. These pins can have a voltage placed on them that varies between 0.0V and 5.0V. Because these pins have 10 bits of resolution, you can map the voltage to a value between 0 and 1023 (i.e., 210 = 1024). (Larger voltages can be measured using voltage divider circuits, but that’s beyond the scope of this article.) Note that the Mega boards offer twice the number of analog pins. Any analog pin can also function as a digital pin, but the reverse is not true.
All boards provide a number of timers that can be used in programs that need things to occur at specific time intervals. Most of these internal timers work by counting clock ticks as the program executes. The millis() function, for example, returns the number of clock ticks that have occurred since the program began execution. Because the clock speed of the system is known, the function can be used to determine time intervals (e.g., seconds). Note, however, that the granularity of the clock is determined by the clock speed. That is, you cannot get better clock resolution than the time it takes for one clock cycle.
The COM, I2C, CAN, and SPI features are communications protocols that are supported by the microcontrollers. For example, if you wanted to connect a 16 characters by 2 line LCD display to an Arduino, this often requires eight digital I/O pins for it to work properly. The I2C interface, on the other hand, only requires two digital I/O pins. Another advantage of the I2C interface is that it can support multiple external devices. The Controller Area Network (CAN) bus is a standard ISO protocol and is popular in the auto industry.
RTC is an abbreviation for Real Time Clock. The on-chip timers are usually measuring clock ticks and are expressed in micro- or milliseconds. Those on-chip timers don’t track the time of day, where an RTC does. These can be very handy if your project is one that syncs with the time of day. For example, if you need to portion out some pet food at 7AM and 6PM, you’d probably want to add an RTC to the Arduino. The Teensy family does have a built-in RTC.
External Devices
Almost any non-trivial microcontroller application uses one or more external devices. For example, the pet food device would need an RTC and probably some kind of valve or relay system from which to dispense the pet food. How do you add these devices to an Arduino?
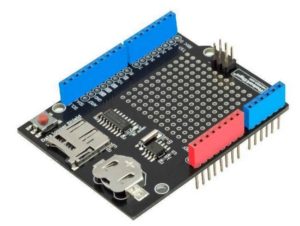
Figure 3. An RTC Arduino shield.
There are dozens, if not hundreds, of devices that have been fabricated into Arduino “shields”. In Figure 2, for example, if you look closely at the Uno and Mega 2560, you can see two sets of header sockets on the upper and lower edges. In Figure 3, you can see the same header layout, and also the matching pins protruding through the bottom of the shield. The pins on the shield fit into the header sockets on the Uno to form an “Arduino sandwich,” which is formed when a shield is mated to a microcontroller board. Shields like these fit the Uno and Mega 2560 boards, but not the Nano nor Mega 2560 Pro Mini boards. Because the shield in Figure 3 also has its own set of header sockets, it is possible to add another shield to the stack, forming an Arduino triple-decker sandwich. The shield in Figure 3 not only has an RTC, it also has a socket for a micro SD card and a button battery: in the event power is lost to the Arduino, the RTC can be maintained. Cost of the shield: about $10. You can buy a smaller (non-shield) RTC module that uses the I2C bus with battery backup for less than a dollar. These smaller modules can easily be interfaced to a Nano or Mega 2560 Pro Mini.
Another benefit of the shield shown in Figure 3 is that it has a prototyping area on the board. You can use the field of “holes” that you see in the center of the board for any special circuitry you might need. If you look closely at Figure 3, you can see a row of holes that line up with the header socket holes. These holes are electrically tied to each header socket pin. This arrangement provides a convenient way to connect your prototype circuit to the host Arduino via the pins protruding through the bottom of the shield.
Regardless of what your project is, there is probably an Arduino shield that can help. I just typed in “Arduino shield” into eBay’s search box and got over 8,300 hits. From joy sticks to GPS systems, there is a huge variety of shields available.
Which Arduino Should I Choose?
I don’t have a clue. The reason is because I don’t have any idea of what your project looks like. If I have a project that needs to rotate a solar panel so it consistently faces the sun, I think a Nano could handle that pretty easily. I’d need a few photo-sensitive sensors and lines to control a stepper motor. On the other hand, if I have sensors tied to 50 different places on an Indy car engine and I need to analyze that data in real time, I’d probably go with a Teensy simply because of the larger number of I/O pins and the higher clock speed that’s likely needed.
Usually, I can make a reasonably intelligent choice just by thinking through the problem the project is supposed to solve. If it appears that my project only requires four I/O channels at slow data speeds (like the sun’s movement), the Nano is likely a good (economical) choice. If the resource demands are such that a Nano can just barely do it, I’d go big, spend another five bucks, and platform the solution on a Mega. That way I’d have a little wiggle room should I need it later.
A Simple Arduino Project
Let’s assume you aren’t sure about your level of interest in microcontrollers. It sounds interesting, but you don’t want to tie up a lot of money just to investigate it a little further. The project discussed in this section will set you back less than $5 if you shop for the parts online. The Nano is the Arduino board we’ll use. We’ll also use an LED and a 220 ohm resistor. Just about any kind of LED will work, and the resistor can be almost any value between 100 and 1000 ohms. (However, the higher the resistance, the less bright the LED can become. Brightness is also influenced by the LED used.) I have purchased Nano’s for as little as $2 each, quantity 5. Make sure you get the Nano and not the Nano Pro Mini. The Pro Mini version doesn’t have the USB connector and, hence, is a little more cumbersome to program.
The circuit is shown in Figure 4. You want to connect the LED cathode lead to the resistor. The other end of the resistor is connected to ground (GND) on the Nano. The LED’s cathode lead is shorter than the anode lead and the cathode lead is aligned with the flat edge of the LED’s plastic housing.
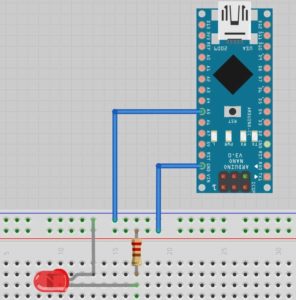
Figure 3. The demonstration circuit.
The anode lead is connected to analog pin A5. Digital pins only have two states: HIGH and LOW. These correspond to +5.0V and 0.0V, respectively. Analog pins, on the other hand, can accommodate a range of voltages between 0.0 and 5.0V. Our project goal is to gradually increase the brightness of the LED by supplying a rising voltage to the LED and then reverse the process and fade back down to the point where the LED goes out. Therefore, we need to choose a pin that supports analog operations. This project is not too ambitious, but, hey, you have to start somewhere.
Installing and Using the IDE
Once the circuit is built, you need to download and install the Arduino IDE. If you need some help installing the software after you’ve downloaded it, there are a lot of tutorials on how to do that. For example:
https://learn.sparkfun.com/tutorials/installing-arduino-ide
I personally install the Arduino software in its own root directory. The latest download at the time of this writing is release 1.8.1. Therefore, for Windows, I would use something like:
C:\Arduino1.8.1
as the root directory name and download the file into the Arduino1.8.1 directory. I would then extract the zip file in that directory. You can choose whatever directory you wish. Once you’re done, connect a USB cable from your PC to the Nano. Now double-click on the arduino.exe file to start the IDE.
Our program code to control the LED is shown in Listing 1.
Listing 1. Program source code for LED program.
int ledPin = 5; //define a pin for LED
void setup()
{
Serial.begin(9600); //Begin serial communication
pinMode(ledPin, OUTPUT );
}
void loop()
{
int i;
for (i = 0; i < 255; i++) { // Run the next 4 statements 256 times
Serial.print(“i = “);
Serial.println(i); //Write the value i to the serial monitor.
analogWrite(ledPin, i);
delay(10);
}
delay(2000);
while (i–) { // Since i = 256 now, this also runs 256 times
Serial.print(“i = “);
Serial.println(i);
analogWrite(ledPin, i);
delay(10);
}
delay(2000); // Wait two seconds and do it all again
}
You should copy or type in this code into the IDE. When you are done, your IDE should look like that shown in Figure 4.
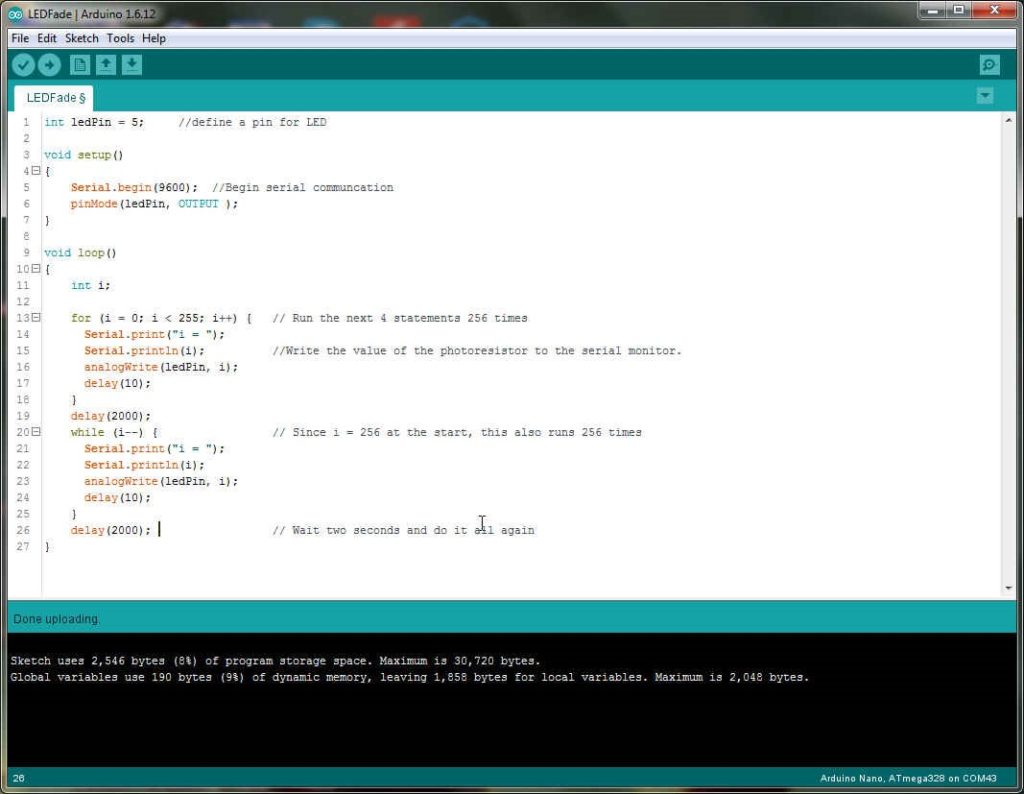
Figure 4. The LED program source code in the IDE.
Reading the Source Code
You may want to print out the source code before reading the next section of the article. The first line in the program defines a variable named ledPin. ledPin is a symbolic name we gave to the variable that we will use to communicate with the Nano I/O pin that connects to the LED. (Again, we chose pin 5 because not all I/O pins work properly with the analogWrite() function.)
Next, when the program starts running, setup() is called first and its statements are executed. Every Arduino program must have the setup() and loop() functions to run properly. The Serial.begin(9600) statement establishes a connection between the Arduino Nano and your PC via the USB cable. It sets the data transfer rate between the two machines to 9600 baud. When you activate the Serial monitor using the small magnifying glass icon just below the X in the upper-right corner of the IDE (see Figure 4), you will see the baud rate display near the lower bottom-right of the Serial monitor. If the output displayed in the Serial monitor looks strange, the most common cause is a mismatched baud rate between the Serial monitor and your program. You can set it using the dropdown list box in the Serial monitor.
The pinMode() statement simply tells the program that we want to use leadPin as an output pin. That is, we want to be able to write data to that pin. If we had needed to read data from an external device into the Nano, we would use INPUT instead of OUTPUT. Note: the C programming language used by the IDE compiler is case sensitive. That is output, Output, and OUTPUT are all viewed as different things by the compiler.
Once the statements in setup() are finished, control is automatically transferred to loop(). The setup() function is only executed one time, and that’s when the program first starts running. The purpose of setup() is to establish the environment in which the program runs. Because we want to communicate with the PC, we establish the communication link and rate via the function call to Serial.begin(9600). We won’t be changing that as the program runs, so placing it in setup() and establishing the link one time is why we put the statement in setup().
The loop() function, however, is very different from setup(). loop() is designed to run forever. More precisely, the loop() function should run until: 1) power is removed, or 2) the reset button is pushed, which restarts the program, or 3) there is a component failure.
The first statement in loop() defines an integer variable name i. That is, we are going to use some SRAM (i.e., stack) memory to create a temporary variable named i. Next, the program begins executing a for statement block. A for statement block is designed to repeat all of the statement between the opening brace ({) and the closing brace (}) a specific number of times. The for loop is established with the statement:
for (i = 0; i < 255; i++) {
Verbalizing this statement, we are saying: “Start this loop by initializing i to zero, and after each pass through the for loop statement block, check to see if i is still less than 255. If i is less than 255, repeat the statements and check me again when you’re done.” At the end of each delay(10) function call at the bottom of the for loop, control immediately transfers to the i++ expression at the end of the for loop statement. This expression simply takes the current value of i and adds 1 to it. It then executes the code to see if i is still less than 255. If it is, we execute the statements in the for loop block again.
Inside the for loop statement block, the first two statements are function calls that send the current value of i to the Serial monitor so you can see its value as the program runs. The next statement uses analogWrite() to send the current value of i to the ledPin. The Nano translates the value of i into a voltage that can vary between 0V and 5V. This changing voltage causes the LED to become brighter as the value of i increases. The LED continues to get brighter until i is incremented to 255. When that happens, the i < 255 expression is no longer true, so the for loop stops executing and program control falls down to the delay(2000) statement. The delay() statement causes the program execution to pause for 2000 milliseconds (i.e., 2 seconds). (delay() uses an internal timer to measure the time interval.) This delay means the LED is shown at its maximum brightness for two seconds.
After the 2 second program pause, program execution resumes with the while statement block. The expression i– decrements the current value of i. As long i is not zero, the statements in the while statement block continue to execute. Because the value of i was 255 when it left the for statement block, i is still 255 when it hits the while loop block. This means that the four statements within the opening and closing braces of the while statement block will be executed 255 times. Because the value of i is decremented (i.e., the i– expression) on each pass through the while loop body, what’s happening to the LED brightness? Yep…it continually get less and less bright because the value of i that’s passed to ledPin in the function call to analogWrite() is decreasing. This also means that the voltage to the LED is also decreasing.
Eventually, the value of i is decremented to zero, which ends the while loop execution and the LED is dark. However, the program doesn’t end because loop() runs forever. The compiler is smart enough to not redefine variable i (and unnecessarily use more SRAM), so execution starts all over again, beginning with the for loop code. The program continues to run until you stop it by removing its power source, or reset it, or some part gives up its magic white smoke. (To us non-electrical engineer types, all electronic circuits run on magic white smoke and when a part in the circuit fails, it often releases its white smoke and the program ends.)
Our LED example is a trivial application, but one that’s pretty easy to understand. However, given all of the I/O pins available and the gaggle of sensors and other devices that you can hang onto a microcontroller, you can probably think of dozens of interesting projects. In fact, I just googled “Arduino projects” and got 1.08 million hits. Whether you’re just trying to get an LED cube to dance to the music being played in the background, or lock your front door over the phone from a thousand miles away, I’ll bet one of those projects is right up your alley.
About the Author
 Dr. Jack Purdum attended Muskingum College (BA, Economics, 1965) and graduate school at The Ohio State University (MA, Economics, 1967, Ph.D., Economics, 1972). He began his teaching career at Creighton University in the Department of Economics in 1970, then to Butler University’s Econ department in 1974, and finally to Purdue University College of Technology in 2001. He became interested in microcomputers in 1975 and won a National Science Foundation grant to study microcomputers in education. He began writing programming books in 1982, mainly on the C programming language. He retired from Purdue University in 2008. Dr. Purdum recently finished his 18th book on C for microcontrollers, enjoys playing golf, and tinkering around with the Atmel family of microcontrollers.


